This guide walks you through installing a child safety car seat in your vehicle and buckling your child in correctly. When you finish, you will have a seat that moves less than one inch at the belt path, a harness that fits your child snugly, and confidence that you can repeat the process every trip. This guide is written for parents, grandparents, and caregivers who are installing a car seat for the first time or who want to verify an existing installation. No prior experience is needed — every step uses either the seat belt or the LATCH system already built into your car. Expect the first installation to take 30-45 minutes as you learn the process; reinstallations typically take 5-10 minutes.

Turn the school run and nap time into listening time
- Thousands of audiobooks, podcasts and originals
- Listen on your phone, tablet or Echo — also offline
- Cancel anytime

Graco Tranzitions 3-in-1 Harness Booster Car Seat, Cinder
- ✔ Seat modes: Forward-facing harness, highback booster, backless booster
- ✔ Harness mode weight range: 26.5–65 lb
- ✔ Booster mode weight range: 40–100 lb

Graco TurboBooster 2.0 Highback and Backless Booster Car Seat, Declan
- ✔ Type: 2-in-1 convertible booster car seat
- ✔ Configurations: Highback and backless
- ✔ Head support: Height-adjustable

Graco TurboBooster 2.0 Backless Booster Car Seat, Denton
- ✔ Type: Backless booster car seat
- ✔ Child age range: 4–10 years
- ✔ Child weight range: 40–100 pounds
Difficulty: Beginner | Time: 45-90 minutes (including seat selection and first installation)
What You’ll Need
Tools & Materials:
- A child safety seat appropriate for your child’s age, weight, and height (rear-facing infant seat, convertible seat, or forward-facing seat with harness)
- The car seat manufacturer’s instruction manual
- Your vehicle owner’s manual (the child restraint section, usually in the index)
- A vehicle with either LATCH anchors (standard on US vehicles after 2002) or working lap-shoulder seat belts
- Tether anchor (for forward-facing seats; standard on vehicles after 2000)
- A towel or pool noodle (optional, for leveling rear-facing seats on sloped vehicle seats)
Knowledge:
- Your child’s current weight and height
- Your child’s date of birth (age determines rear-facing vs. forward-facing stage)
- How to read the weight limit labels on the side of your car seat
Before you start, register your car seat with the manufacturer (a postage-paid card is included in the box, or register online). Registration is the only way you will be notified if the seat is recalled. Never use a secondhand seat unless you know its full crash history — a seat that has been in any crash, even a minor one, may no longer be safe. Check the expiration date molded into the plastic shell or printed on a label; most seats expire 6-10 years after manufacture.
Graco Tranzitions 3-in-1 Harness Booster Car Seat, Cinder
Of the three seats here, the Tranzitions 3-in-1 is the only one with an internal harness, and that single fact shapes everything else about it. In harness mode it accommodates children from 26.5 to 65 pounds, then converts to a highback booster and finally a backless booster up to 100 pounds. That means one seat can potentially carry a child from preschool through age ten — something neither TurboBooster model can claim, since both require the child to be at least 40 pounds and belt-ready from day one.Where this option stands out is adjustability without frustration. The harness and headrest move together through nine positions without rethreading, which matters because harness strap height needs to change as your child grows, and rethreading is the chore most parents postpone too long. The machine-washable seat pad is another quiet advantage over fixed-upholstery designs. Compared with the TurboBooster Highback, the Tranzitions is also lighter and easier to move between vehicles, which makes it a favorite for grandparents’ cars and carpools.The tradeoffs are real, though. There is no rear-facing mode, so it can’t be a child’s first car seat — you’ll still need an infant or convertible seat before this one. And the booster modes require a minimum of 40 pounds, so lighter children will spend longer in harness mode, which is actually the safest place for them anyway.
Pros:
- Three modes — harness, highback booster, and backless booster — cover up to a decade of use
- No-rethread harness and headrest adjust together through nine positions
- Lightweight design makes it easy to transfer between vehicles
- Machine-washable seat pad simplifies cleanup after spills
Cons:
- Booster modes require a minimum weight of 40 pounds
- No rear-facing mode, so it cannot serve as a first car seat
Best for: Families with children roughly 2.5–4 years old who are forward-facing and want one seat to last through the booster years
Not ideal for: Parents of infants or rear-facing toddlers, or families who already own a harnessed seat their child hasn’t outgrown
Bottom line: If you’re buying one seat to cover the longest stretch of your child’s car-seat years, this is the pick that makes the most sense.
“If you’re buying one seat to cover the longest stretch of your child’s car-seat years, this is the pick that makes the most sense.”
Graco TurboBooster 2.0 Highback and Backless Booster Car Seat, Declan
The TurboBooster 2.0 Highback and Backless sits in the sweet spot between the two other seats in this lineup. Unlike the Tranzitions, it has no harness — your child rides with the vehicle seat belt from the start. But unlike the backless version, it provides head and torso support, which does two important jobs: it positions the shoulder belt correctly at the collarbone, and it gives a sleepy child something to lean against instead of slumping out of position.The 2-in-1 conversion is what makes this model better value than the backless TurboBooster for most families. You start in highback mode while your child is still learning to sit properly with a belt, then remove the back when they’re older and the vehicle’s own head support becomes adequate. The height-adjustable head support and armrests grow along with that transition, and the open-loop belt guides make it visually obvious when the belt is threaded correctly — a small detail that reduces installation mistakes.Compared with the Tranzitions, this model is the right choice when your child has already outgrown their harness (typically past 65 pounds or too tall for the straps) — buying the Tranzitions at that point means paying for a harness mode you’ll never use. The limitation to understand going in: there is no harness at all, so this seat is only appropriate for children who are mature enough to keep the belt in place for an entire ride, every ride.
Pros:
- Converts from highback to backless so it adapts as your child matures
- Height-adjustable head support and armrests accommodate growth
- Open-loop belt guides make correct seat belt positioning easy to verify
- Hide-away cup holders keep the design tidy when not in use
Cons:
- No internal harness, so it relies entirely on the vehicle seat belt
- Requires children to sit correctly positioned on every ride
Best for: Children who have outgrown a harnessed seat but still need head support and belt guidance
Not ideal for: Younger or lighter children who still need a harness, and kids who frequently fall asleep in the car before they’ve mastered belt discipline
Bottom line: This model makes the most sense for the belt-training years — the stretch when a child is too big for a harness but not yet ready to ride backless.
“This model makes the most sense for the belt-training years — the stretch when a child is too big for a harness but not yet ready to ride backless.”
Graco TurboBooster 2.0 Backless Booster Car Seat, Denton
At first glance the backless TurboBooster 2.0 looks like the stripped-down sibling of the highback version — and in a sense, it is. But that simplicity is precisely its value. It does one job: lifting a child high enough that the vehicle lap belt sits across their hips and the shoulder belt crosses their chest, not their neck or stomach. For a child within its limits (4–10 years, 40–100 pounds, up to 57 inches), that’s all the safety function a backless booster needs to provide.Its strongest attribute compared with both other seats is portability. With no back or headrest structure, it’s light enough to move between cars, stash in a trunk for an unexpected carpool, or pack for travel. The Tranzitions and the highback TurboBooster are designed to live semi-permanently in one vehicle; this one is designed to go wherever it’s needed. The hide-away cup holders and height-adjustable armrests are thoughtful touches that keep the low-profile design comfortable.The drawback is structural and unavoidable: no back or head support means no side-impact structure, and no support for a sleeping child’s head. It also assumes your vehicle has adequate head restraint behind the child. If your child still nods off in the car, the highback Declan model is the better choice — this one is strictly for belt-disciplined older kids.
Pros:
- Raises children so the vehicle seat belt is positioned correctly across hips and chest
- Extremely lightweight and easy to move between vehicles or pack for travel
- Height-adjustable armrests add comfort without bulk
- Engineered and tested for frontal, rear, and rollover crash protection
Cons:
- Backless design provides no back, head, or side-impact support
- Strictly limited to children within the specified age, weight, and height range
Best for: Older children (roughly 6–10) who sit properly with a belt, and families who need a spare or travel booster
Not ideal for: Younger children still learning belt discipline, frequent car sleepers, and children outside the 40–100 lb and 57-inch limits
Bottom line: This is the right final-stage booster for an older, belt-reliable child — and the wrong choice for anyone who still needs head support.
“This is the right final-stage booster for an older, belt-reliable child — and the wrong choice for anyone who still needs head support.”
As an Amazon Associate we earn from qualifying purchases.
Before You Start
Do a quick fit check between your seat and your vehicle before committing. Read the rear-facing section of your car seat manual and the child restraint section of your vehicle manual. Some vehicle back seats are contoured or sloped in ways that make certain seats sit at the wrong angle. If you have not yet purchased a seat, keep the receipt until you confirm the installation works. Also decide where the seat will go: the back seat is required for children, and the center rear position is statistically safest if the seat installs securely there and your vehicle manual permits it. Never place a rear-facing seat in front of an active airbag. If your only option is the front passenger seat, deactivate the airbag first — but treat this as a last resort.
Step-by-Step Instructions
Step 1: Confirm your seat matches your child’s size and stage
Check the label on the side of the car seat for weight and height ranges. Weigh and measure your child against those limits. Children under age 2 should ride rear-facing; keep them rear-facing until they reach the maximum rear-facing weight or height limit of the seat, which is often age 3 or 4 for convertible seats. Never move a child to the next stage early — moving from rear-facing to forward-facing, or from harness to booster, is always a step down in safety.
Tip: Rear-facing is safest because it cradles the head, neck, and spine in a crash. Legs touching the vehicle seat back is normal and not a safety problem.
Check: Your child’s current weight and height are within the printed limits for the mode you plan to use.
Step 2: Set the seat to the correct mode and angle
Adjust the seat to match the direction and recline you need before putting it in the car. For rear-facing, set the recline indicator (a line, ball, or dial on the side of the seat) to the range shown in the manual for your child’s age. For forward-facing, set the seat upright and, if the seat has one, adjust the recline to the forward-facing position. Move the harness straps to the correct position now: rear-facing, straps should come through the slot at or below your child’s shoulders; forward-facing, at or above.
Tip: Newborns need a more reclined angle (usually 30-45 degrees) to keep their airway open. Older rear-facing toddlers can sit more upright within the allowed range.
Check: The recline indicator sits inside the acceptable zone, and harness straps are threaded through the correct shoulder slots.
Step 3: Position the seat and locate the correct anchors or belt path
Place the car seat in the back seat where you plan to use it. Identify which attachment method you will use: either the LATCH lower anchors (metal bars in the crease between the seat cushion and seat back) or the seat belt. Then find the correct belt path on the car seat itself — rear-facing seats and forward-facing seats use different routing paths, clearly marked in colored labels on most seats. Thread the LATCH strap or seat belt through the correct path.
Tip: Use only one system — LATCH or seat belt, never both together unless the manual explicitly permits it. Also check the LATCH weight limit: once your child plus the seat weight exceed it (often 65 lbs combined), switch to the seat belt.
Check: The belt or LATCH strap runs through the path labeled for your seat’s direction, with no twists in the strap or belt.
Step 4: Connect and tighten the installation
For LATCH: clip both connectors onto the metal anchor bars until they click. For seat belt: buckle the belt, then lock it — pull the shoulder belt all the way out and let it retract to engage the locking feature, or activate the locking clip or lock-off on the car seat as the manual directs. Press down hard on the seat with your full body weight (kneel or lean into it), and pull the LATCH strap or shoulder belt tight at the same time. Get the belt as tight as you physically can.
Tip: Put your knee into the seat base or push down where your child’s bottom sits — compressing the seat helps the belt grip.
Check: Grab the seat at the belt path and tug firmly side to side and front to back. It should move less than one inch in any direction at the belt path.
Step 5: Attach the tether for forward-facing seats
If the seat is forward-facing, find the tether strap on the top back of the car seat and the tether anchor in your vehicle — usually a loop or bar behind the rear seat headrest, on the rear shelf, or in the cargo area floor. Clip the tether hook to the anchor and pull the adjuster until the strap is snug. The tether is required, not optional: it reduces how far a child’s head moves forward in a crash.
Tip: If you cannot find the tether anchor, check the vehicle manual index under ‘tether’ — locations vary widely between models.
Check: The tether strap is attached to the designated anchor and tight, with no slack.
Step 6: Adjust the harness to fit your child
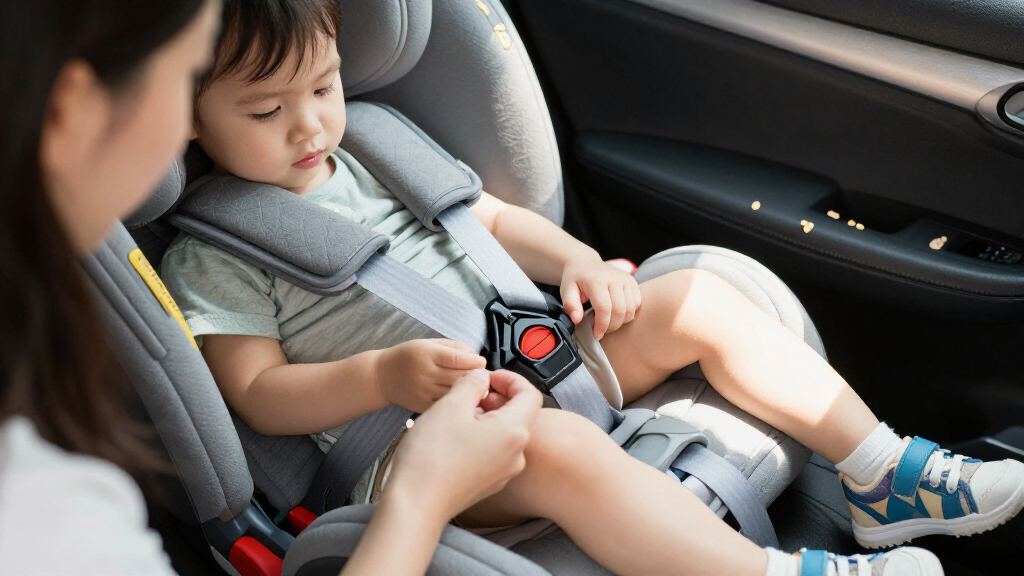
Place your child in the seat. Check that the harness straps are at the correct shoulder height, then buckle the chest clip and the crotch buckle. Pull the harness adjuster strap (usually between the child’s feet or on the front of the seat) until the straps are snug. Test tightness with the pinch test: try to pinch the harness strap vertically at the child’s shoulder. If you can pinch any slack between your fingers, tighten more. Position the chest clip at armpit level.
Tip: Bulky coats cause dangerous harness slack because they compress in a crash. Remove puffy jackets, buckle the harness snug, then place a blanket over the strapped-in child for warmth.
Check: You cannot pinch any slack in the harness at the shoulder, the chest clip sits at armpit level, and the straps lie flat without twists.
Step 7: Do a final full inspection and practice reinstalling
Walk through every check: seat direction correct, recline in range, installation tight at the belt path, tether attached (forward-facing), harness at correct height, snug, and chest clip at armpit level. Then practice unhooking and reinstalling the seat once while the process is fresh, so you can do it confidently at an airport, in a rental car, or after cleaning the seat.
Check: Every check passes, and you can reinstall the seat to the same tightness in under 10 minutes without consulting the manual.
Common Mistakes to Avoid
- The installed seat moves more than one inch at the belt path. — Always tighten while pressing your body weight into the seat, and test at the belt path — not at the top of the seat, where some movement is normal.
- Harness straps are too loose or the chest clip sits at the belly. — Use the pinch test every single trip, and reposition the chest clip to armpit level before driving. This takes five seconds once it becomes routine.
- Turning the child forward-facing too early. — Follow the seat’s maximum rear-facing weight and height limits, not just the legal minimum. Keep the child rear-facing until they outgrow the rear-facing limits of the seat.
- Using both LATCH and the seat belt together, or exceeding the LATCH weight limit. — Pick one system, and re-check the LATCH weight limit printed on the seat label. When your child gets heavier, switch the installation to the seat belt.
Troubleshooting
Problem: The seat will not tighten no matter how hard you pull.
Solution: Check for twists in the LATCH strap or seat belt, confirm you are using the correct belt path, and make sure the belt is actually locked. On sloped seats, try a different seating position or route the belt again while kneeling in the seat.
Problem: The rear-facing seat sits at the wrong angle — too upright for a newborn or too reclined for a toddler.
Solution: Adjust the recline foot or base angle if the seat has one. If it still cannot reach the correct range, place a tightly rolled towel or cut pool noodle under the seat base at the vehicle seat crease, if your manual permits it, and recheck the indicator.
Problem: LATCH connectors will not click onto the anchors, or you cannot find the anchors.
Solution: The anchors are sometimes buried deep in the seat crease — dig into the cushion gap. If your seating position has no LATCH anchors (common in the center seat), install with the seat belt instead.
Problem: The harness won’t tighten around your child.
Solution: The strap behind the seat may be twisted or caught, or the harness may be threaded through uneven slots. Unbuckle, remove your child, and retrace both straps from the adjuster to the shoulder pads, removing all twists.
What Success Looks Like
Your installation is correct when all of the following are true: the seat moves less than one inch side to side and front to back when tested at the belt path; the recline indicator is in the acceptable range; a forward-facing seat has a tight, attached tether; the harness straps sit at or below the shoulders (rear-facing) or at or above the shoulders (forward-facing) with no twists; you cannot pinch any slack in the harness at the shoulder; the chest clip sits at armpit level; and your child fits within the seat’s printed weight and height limits for the mode in use. For extra confirmation, get your installation checked in person by a certified Child Passenger Safety Technician — many fire stations, police departments, and hospitals offer free checks, and you can find one through the NHTSA website or Safe Kids Worldwide.
Next Steps
Re-check the installation monthly and after anyone else reinstall the seat. Re-adjust the harness height whenever the straps fall below your child’s shoulders (rear-facing) or you notice they have outgrown the current slot. Watch for the transition points ahead: move forward-facing only when your child outgrows the rear-facing limits, and switch to a booster only when the harness limits are exceeded — often age 5 or 6. Replace the seat after any crash, even a minor one, and check the expiration date on the shell. Register your seat with the manufacturer today if you have not already. Finally, schedule a free inspection with a certified Child Passenger Safety Technician within the first few weeks — a professional second look catches issues that even careful self-checks miss.
Frequently Asked Questions
When can my child stop using a rear-facing seat?
Legally, most US states require rear-facing until at least age 2, but safety experts recommend keeping children rear-facing until they reach the maximum weight or height limit printed on the seat — often age 3 or 4. Rear-facing protects the head, neck, and spine far better in a frontal crash, so delay the switch as long as the limits allow.
Is the middle of the back seat really the safest spot?
Statistically yes, because it is farthest from any point of impact — but only if the seat installs tightly there and your vehicle manual approves that position for a car seat. A secure installation in an outboard position beats a loose one in the center.
Can my child wear a winter coat in the car seat?
No. Puffy coats create slack that disappears in a crash, leaving the harness dangerously loose. Remove the coat, buckle the harness snug, and use a blanket or the coat backwards over the child’s arms for warmth.
Can I use a car seat after a minor crash, or a secondhand seat from a friend?
Replace any seat that has been in a crash — damage to the energy-absorbing foam and shell is not always visible. For secondhand seats, only accept one if you know its full history, it has never been in a crash, it is not expired, all parts and the manual are present, and it has not been recalled.
Do car seats really expire?
Yes. Most expire 6-10 years from the manufacture date due to plastic fatigue from heat and cold cycles, worn harness webbing, and outdated designs. Find the expiration date molded into the shell or printed on a label, and stop using the seat after that date.
Fall Picks
fall essentials
As an affiliate, we earn on qualifying purchases.